ZoomFolio WordPress DZS
Author: Digital Zoom Studio
Twitter: http://twitter.com/
Facebook: http://facebook.com/dzs
Support - via item comments
Intro - top
DZS ZoomFolio is the ultimate plugin for displaying your creative portfolio to your clients and that's not all. You can use it to show the recent posts from your blog or a gallery from your vacation. The possibilities are endless. And the backend helps you do just that in a easy way. Uses the WordPress's Custom Post Types for you to create Portfolio items in the WordPress intuitive way. It's based on shortcodes, but there is zero effort to understand how you customize it because there is a intuitive Shortcode Generator bundled that does just that for you.
Features
- easy to install - install and get this plugin ready in less then one minutes.
- responsive - looks great from mobile to HD
- shortcode generator - customize skins, categories to show and others via the shortcode generator
- CSS3 technology - this gallery uses cutting-edge css3 definitions to render awesome 3D effects in supporting browsers, the others will degrade gracefully
- compatible with all major browsers, including IE - compatible from IE7 to IE10, Chrome, Safari and Firefox
- SEO friendly - built with search engine optimization on mind from the ground up, the Testimonial Rotator uses non hidden valid html markup to build the widget
- iPhone / iPad optimized - this gallery has been optimized for Apple touch devices
- Android optimized - this component has been tested on Android 4.0 and works awesome
What do you get?
- ZoomFolio WordPress plugin - get creative!
- documentation - extensive documentation on how to install & configure the plugin
- free updates - even if the value of this gallery increases with upcoming updates, you will get them for free
- free support - for installation via my forum -> http://digitalzoomstudio.net/support/ this is the fastest form of support
Installation - top
There are two ways to install the plugin
Method 1 - Direct WordPress Install
- Just download the zip from your http://activeden.net/user/yourusername/downloads directory in a folder of your choosing.
- Then in your wordpress installation, in the Plugins panel, click Add New like in this picture:


- Then click Upload, and select the zip you have downloaded from CC. Then click Activate.
- Create Portfolio Items from your dashboard > Portfolio Items
- Access any post / page and you should now see this icon above the editor
- This launches a editor in a lightbox that generates the shortcode based on the options you select. Start cusomizing to your needs. Have fun!
Method 2 - FTP Install
- Just download the zip from your http://activeden.net/user/yourusername/downloads directory in a folder of your choosing.
- Unzip it with your preffered unziping utility.
- Then, if the folder dzs-portfolio is zipped, unzip that too. The copy the folder in the wp-content/plugins folder. On Windows, there can be some warnings while unziping. Those are nothing to worry about if they appear, they are just Mac OS X files that cannot be read by Windows.
- Then in your wordpress installation, in the Plugins panel, locate DZS ZoomFolio and click Activate
- Create Portfolio Items from your dashboard > Portfolio Items
- Access any post / page and you should now see this icon above the editor

- This launches a editor in a lightbox that generates the shortcode based on the options you select. Start customizing to your needs. Have fun!
Recommended FTP client: Filezilla
This video should make it crystal clear on how to install and add some data
Adding to the Post / Page - top
- access / create your post / page
- use the shortcode generator to get a shortcode like this generated
[portfolio skin="skin-default" sortable="on" settings_disablecats="off"]
- all done!
Customize - top
First of all,
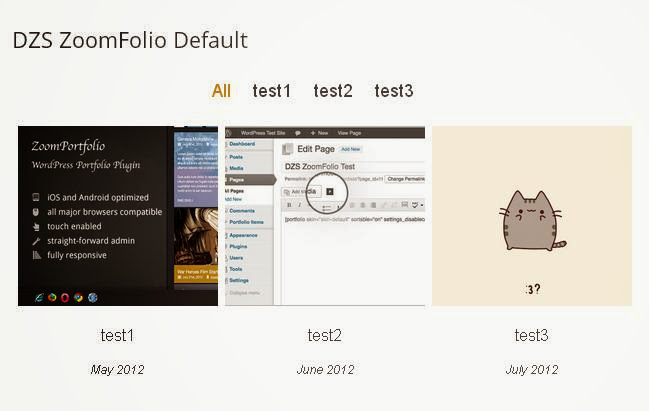
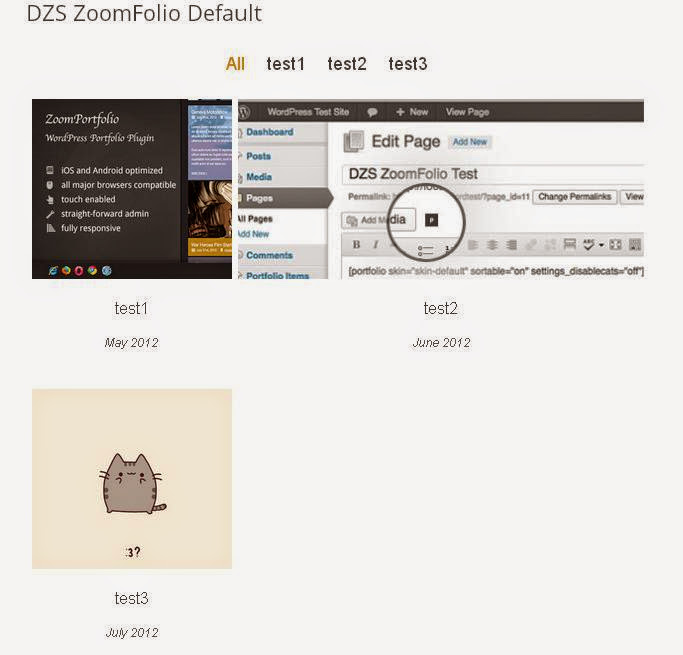
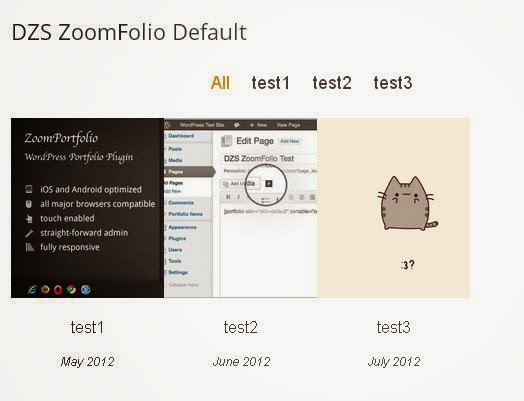
The plugin is made to display your potfolio items. You can access them from your WordPress Dashboard > Portfolio Items and create as many as you wish. Don't forget to add the Featured Image in order for the thumbnail to appear.
The item structure

This is the skin-default item structure. The structure can differ from skin to skin, but this is the main idea of customization.
Shortcode Generator

This plugin is based on shortcodes. This popup that assembles when you push the Portfolio button will be reffered too as the Shortcode Generator - it includes most of the options you can customize. Once the Shortcode is generated, the parameters can be edited manually.
For reference, this is an example output by the Shortcode Generator, offcouse it can be manually inputed too.
[zoomfolio settings_mode="masonry" skin="skin-accordion" settings_specialgrid="none" settings_lightboxlibrary="zoombox" design_item_width="100%" fullscreen="off" settings_disablecats="off" settings_preloadall="off" design_categories_pos="top" settings_ajax="off" bgcolor="transparent"]
What does each option do ?
What if I just want to display regular posts ?
When you access the Shortcode Generator, you will see a WordPress Query field. Write there the following code:
post_type=post
The Big Image
You may notice in some demos that you have the posibility to open a bigger image in a lightbox.
You can add Big Images by going to your specific Portfolio Item and populating the Big Image field with a link to a image. You can use the Upload button bundled in the package.
The item type
You'll notice the first meta option for each Portfolio Item is the Media Type

It can be a image, a gallery, an audio item etc.
After you select the type, instructions will appear underneath the Featured Media field on how to customize the item. Most items are set up from the Featured Media field.
Set up the item as a link
To setup an item as a link( that has all title and image as a link ) is very simple, just set up the Portfolio Item as a link by clicking this icon.

And input the link in the Featured Media field.
What does each option from DZS ZoomFolio Settings do ?
Set it up as Wall Style and Fullscreen
You can follow the video below.
Set up Content Opener for skin-clean or skin-accordion
You can follow the video below.
Also note that to set the gallery on which each item open you can use the Item Gallery tab on each Portfolio Item.
This is the shortcode. Remember to set Misc Options > Maximum Number of Characters for Content to all in the shortcode generator
You also need to set Featured Media Link to Content Opener for ecah Portfolio Item / Post that you want to open the Content Opener.
The custom text on the right in the demo. You can just insert it in your post content.
<h4>Corporate Brouchure</h4>
<p>Lorem ipsum dolor sit amet, consectetur adipisicing elit, sed do eiusmod tempor incididunt ut labore et dolore magna aliqua. Ut enim ad minim veniam, quis nostrud exercitation ullamco laboris nisi ut aliquip ex ea commodo... <a href="#">[ Read More ]</a></p>
<div class="simple-hr-with-mb-20"></div>
<p><span class="meta-prop-label">Categories:</span> Illustration / Print</p>
<div class="simple-hr-with-mb-20"></div>
<p><span class="meta-prop-label">Date:</span> 14 Jul 2014</p>
<div class="simple-hr-with-mb-20"></div>
<p><span class="meta-prop-label">Project URL:</span> <a href="#">Live Preview</a></p>
<div class="simple-hr-with-mb-20"></div>
<p><span class="meta-prop-label">Share:</span> Illustration / Print</p>
What are the differences between the special grids?
Here you can see some screens with the visual aspects of the special grids:
Special-grid-none
Special-grid-1
Special-grid-2
Special-grid-3
Special-grid-4

Special-grid-5

Twitter Items
In order to retrieve twitter items, the plugin uses Twitter API 1.1 - which requires oAuth login. What that means for you, is you have to register a new application on this site - https://dev.twitter.com/apps/new - and supply the required fields inside Settings > DZS Portfolio Settings

Set it up as Media Gallery style (demo here )
It's very simple. First set up the skin to skin-boxed .Then you can select the type of each item ( as seen above ), hero images ( the icons in the center of the item ) will be set automatically.
Set it up as Scrolling Content style ( demo here )
Just set the mode to Advanced Scroller. All gallery items will be styled according to the
Import Skin Blog Example ( demo here )
A sample comes bundled with the plugin.
To install it, first import it via the WordPress Importer
How to install WordPress Importer
- access your WP Dashboard
- click Tools > Import

- choose WordPress as the import source

- click Install Now
- click Activate
- choose the import file

In this case, choose the dzs-portfolio/samples/skin_blog.xml
After the import is succesful ( remember, you need to have ZoomFolio activated ) you can place the shortcode found indzs-portfolio/samples/skin_blog.txt into any Page / Post.
How to set up YouTube videos with a cover photo ( thumbnail )
Setting up a YouTube video to appear in the portfolio is pretty straight forward. Just go the Portfolio Item from the Portfolio Items menu . Select the type to YouTube and in the Featured Media field input the youtube video id. And for the Featured Image, click the set Featured Image and choose a thumbnail. It will appear before the video plays.
Some Example Shortcodes
blog example with endless scrolling
recent posts ( let's say 206 and 207 are your categories ids )
gallery shortcode
client list ( from demo )
The Excerpt
In the first demo, you can see some dates like January 2013. Those are added from the Subtitle field you have when editing the Portfolio Item.
Skin_blog meta fields
This is the default setup
This means that under the title will appear the post date, the post categories and the number of comments. The order, details can be changed by just changing the position in the text.
Let's say for example we want only the date to appear
Then lets say we want to add a custom field from our posts
The icon- part represents a fontawesome icon from here- http://fontawesome.io/icons/
While the cf is a custom field - and can be found in any post ( activate Custom Fields in the top of each post edit screen if necessary )

The result

How to build a portfolio page with slider with Item Builder
WP ZoomFolio offers a complete solution to build the portfolio page. And the portfolio items page individually. In the preview you will see a theme with a Portfolio Item on a page. It was build very easy via Page Builder included.
- access any portfolio item
- go below to Layoutitem xxxx
- add a new 2/3 + 1/3 layout ( fig 1 )
- drag the slider icon above the first white block ( fig 2 )
- drag the content icon above the second

Localization
The process to translate the plugin is fairly easy:
- download poedit
- go to the plugin folder ( wp-content/plugins/dzs-zoomfolio or in the package you receive from CC ) to the languages folder
- duplicate default.po and rename the dupe to dzsp-{region}_{language}.po -> for example for Spain / Spanish it's dzsp-es_ES.po you can find the format for each language in the link above
- open the newly renamed file in poedit - do the changes and save - a .mo file with the same name will be created - that will be the translation file
FAQ - top
You can check this link for a list of popular questions. Other questions you might have:
What is an youtube ID?
Take this movie for example - http://www.youtube.com/watch?v=UXLvR6ZaZk4 . The youtube ID is just this part: UXLvR6ZaZk4
How about if I want a CMS / admin version [ no wordpress ] ?
A non cms version will be launched soon, you can follow / ask us on facebook for details.
Developer Tips ( for advanced usage ) - top
This gallery provides all source files so if you are developer you can start customizing it.
Recommended Programs
You can generally use any text editing software to edit most content/code, but this is what I recommend:
- .zip – Normally you could just right click and extract to a folder of choice [ on both Mac and Windows ]
- .html - Notepad++
- .js - Notepad++
- .as - Notepad++
- .fla - Flash CS5
- .xml – Notepad++
Make your own skin
- duplicate all the .dzsportfolio.skin-blog to .dzsportfolio.skin-yourskinname
- start customizing the new skin-yourskinname references
- change the shortcodes skin attribute to skin-yourskinname
- be crazy, with a little css knowledge , the possibilities are endless