Table of Contents
DZS Events Calendar WordPress Plugin
Created: 27/02/2013
By: Digital Zoom Studio
Twitter: http://twitter.com/
Facebook: http://facebook.com/dzs
Support Forum: http://dzs.net/support/
Thank you for purchasing my component. If you have any questions that are beyond the scope of this help file, please feel free to apply for membership on the forum, it's the fastest way of support [ link to the left ] and post a thread about your question after your membership is validated.
Intro - top
The events calendar you have to been waiting for. Simple to setup. Powerful. Documented. Fast. - DZS Events Calendar WordPress Plugin
Features
- easy install – purchase, download the zip, read the docs
- dzs tooltips included - a tooltip plugin from our portfolio is included to provide rich experience to your users
- five skins - default and black
- iPhone/iPad compatible – this plugin is compatible with iToys, even Android works
- major browsers support – IE7, IE8, IE9, IE10, Chrome, Opera, Safari and Firefox fully tested
- html supported – inline content is no problem for this plugin
- powerful admin - harness the magic in DZS Sliders Admin V2
What do you get?
- Calendar WordPress plugin - get creative!
- documentation - extensive documentation on how to install & configure the plugin
- free updates - even if the value of this gallery increases with upcoming updates, you will get them for free
- free support - for installation via my forum -> http://digitalzoomstudio.net/support/ this is the fastest form of support
Installation - top
There are two ways to install the plugin
Method 1 - Direct WordPress Install
- Just download the zip from your http://activeden.net/user/yourusername/downloads directory in a folder of your choosing.
- Then in your wordpress installation, in the Plugins panel, click Add New like in this picture:


- Then click Upload, and select the zip you have downloaded from CC. Then click Activate.
- Access the admin panel from your Dashboard > Calendar
- Access any post / page and you should now see this icon above the editor

- This launches a editor in a lightbox that generates the shortcode based on the options you select. Start cusomizing to your needs. Have fun!
Method 2 - FTP Install
- Just download the zip from your http://activeden.net/user/yourusername/downloads directory in a folder of your choosing.
- Unzip it with your preffered unziping utility.
- Then, if the folder dzs-portfolio is zipped, unzip that too. The copy the folder in the wp-content/plugins folder. On Windows, there can be some warnings while unziping. Those are nothing to worry about if they appear, they are just Mac OS X files that cannot be read by Windows.
- Then in your wordpress installation, in the Plugins panel, locate DZS Calendar and click Activate
- Access the admin panel from your Dashboard > Calendar and create events calendars
- Access any post / page and you should now see this icon above the editor
- This launches a editor in a lightbox that generates the shortcode based on the options you select. Start customizing to your needs. Have fun!
Recommended FTP client: Filezilla
This video should make it crystal clear on how to install and add some data - you cannot go wrong with this video.
Adding to the Post / Page - top
- create calendars via Dashboard > Calendar menu
- access / create your post / page
- use the shortcode generator to get a shortcode like this generated
[calendar id="default"]
- replace default with the id you have set in the admin panel

- all done!
Customize - top
Widget Included
The plugin also features an widget that you can add to any of your sidebars. It will appeare as DZS Calendar in your Appearence > Widgets page.
The widget can be configured by Title and ID - the gallery which ID's it holds is still configured from the DZS Calendar admin in Settings menu.
Import / Export Database -/- Gear Menu
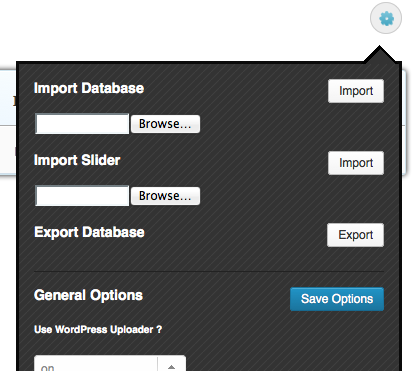
enable / disable prettyphoto ( recommended: on )
enable / disable uploading in wp-content/upload folder instead of the plugin folder for the multi uploader and non WordPress upload method. Once this is activated it will move upload.php and the upload folder to wp-content folder. If you do not enable this, and use the plugin folder, take caution that existing uploads will get deleted on plugin update.
note: if you have enabled external wp-content upload and want the files to be available in your media gallery, you can use a plugin like Add From Server to accomplish that
Admin Menu Explained
slider
The main division in the admin panel, sliders are independent to each other, each slider has it's own items and main settings, you can add new sliders via the Add Slider button underneath the table. Multiple slidesrs with different ids can be added into one page.

items
The items are divisions of a slider. They each have their own settings and preview image which show up if the item is an image. The top right button deletes the item and the bottom left duplicates the item.

extra: in the timeline slider there are 3 types of items ( see Images, Marks and Milestones section above )
dzs multi uploader

If you have a modern browser ( and you should ) - you can use it's full power to bring you accesibility and easy uploading. Just drag and drop your images ( can be multiple ) and they will automatically added as image items.
Database Select

In the top area you will see a button stating the curent database. You can click on it and it will render a list of databases you have created to write galleries in. You can create new databases for galleries by writing a name for your new database in the lat item of the select database container. Once you have created your gallery in the database you can insert in the content via
Note: if you have many galleries, it is recommeded to distribute them accross multiple databases. So if one crashes, the other ones are safe.
Localization
The process to translate the plugin is fairly easy:
- download poedit
- go to the plugin folder ( wp-content/plugins/dzs-zoomfolio or in the package you receive from CC ) to the languages folder
- duplicate default.po and rename the dupe to dzsp-{region}_{language}.po -> for example for Spain / Spanish it's dzsp-es_ES.po you can find the format for each language in the link above
- open the newly renamed file in poedit - do the changes and save - a .mo file with the same name will be created - that will be the translation file
FAQ - top
You can check this link for a list of popular questions.
How to include shortcode in header.php or any content file
use this code
<?php echo do_shortcode('[dzs_calendar id="theid"]'); ?>
Developer Tips ( for advanced usage ) - top
This gallery provides all source files so if you are developer you can start customizing it.
Recommended Programs
You can generally use any text editing software to edit most content/code, but this is what I recommend:
- .zip – Normally you could just right click and extract to a folder of choice [ on both Mac and Windows ]
- .html - Notepad++
- .js - Notepad++
- .as - Notepad++
- .fla - Flash CS5
- .xml – Notepad++
Make your own skin
- duplicate all the .dzscalendar.skin-skinsresponsive to .dzscalendar.skin-yourskinname
- start customizing the new skin-yourskinname references
- change the shortcodes skin attribute to skin-yourskinname
- be crazy, with a little css knowledge , the possibilities are endless
Digital Zoom Studio