Table of Contents
Zoom Video Player
Created: 08/24/2014
By: Digital Zoom Studio
Twitter: http://twitter.com/
Facebook: http://facebook.com/dzs
Support Forum: http://dzs.net/support/
Thank you for purchasing my component. If you have any questions that are beyond the scope of this help file, please feel free to apply for membership on the forum, it's the fastest way of support [ link to the left ] and post a thread about your question after your membership is validated.
Intro Video Player - top
Zoom Video Player is the only video player you will ever need because it's completely functional and customizable. Why is it called Zoom Video Player ? Because the graphics are rendered crisp even at 3200% zoom thanks to SVG graphics. The player includes all the functions one would want - autoplay, cue, loop, api, touch ready, responsive and plays from different stream providers. It's unique feature is, although being so functional, it's extreme customizablility. You can change player controls position, color and even add your own contorls with the included builder.
This is inspired from the video player of our best selling video gallery and it was rebuilt from scratch based on our customers feedback and requests like full player customizability, preroll, midroll and postroll ads and multiple streams support.
Video Player Features
- HTML5 technology - this player uses the latest html5 tehniques ( like History API ) to deliver a never seen before experience to your clients
- fully responsive - looks great from mobile to HD
- touch optimized - touch devices are not forgotten
- four skins - four full skins to fit every brand and ..
- skin builder - build your own skins from scratch / no coding required
- CSS3 technology - this player uses cutting-edge css3 definitions
- easy install - purchase, download the zip, read the docs
- iPhone / iPad optimized - this gallery has been optimized for Apple touch devices
- Android optimized - this component has been tested on Android 4.0 Chrome
- SEO friendly - built with search engine optimization on mind from the ground up, the Testimonial Rotator uses non hidden valid html markup to build the widget
- compatible with all major browsers, including IE - compatible from IE9 to IE11, Chrome, Safari and Firefox
- retina ready - because of svg graphics it will look
- unmatched ad possibilities - add your ads pre-roll, mid-roll or post-roll ads
- API ready - use the integrated API to play, pause or seek the video
- embed ready - allow users to embed the video player on their site
- youtube / vimeo ready - add streams from your favorite video share sites very easily just by inputting the link to the video or id into the source attribute of the player
- only one format required - just mp4 / m4v format is required with optional ogg / ogv backup
- flash backup included - for older browser / or for when mp4 is not supported by the browser html5 engine
- live stream ready - this player is WOWZA Streaming Engine ready which means you can setup your streams or live stream easily on all devices!
- developer / SASS powered - this component's CSS has been built on top of SASS which means SASS users will have an easy time modifying the skins. For non-SASS users it's no problem either because CSS files ( generated by SASS ) are provided
Installation - top
All you have to do for installing on your site (ie. yoursite.com) is copy the contents of the /source folder to a folder (ie. yourfolder) on your site via ftp ( with filezilla ) or any other upload service. You can then access your contents via http://yoursite.com/yourfolder.
Integrating in your project - top
In order to install this component in your html page you need to:
- unpack the download package, open the source folder
- copy the folder /zoomplayer and playerlight.swf into your project folder
- open your html file and insert this inside your <head> tag
<script type="text/javascript" src="https://ajax.googleapis.com/ajax/libs/jquery/1.11.1/jquery.min.js"></script>
<link rel='stylesheet' type="text/css" href="zoomplayer/zoomplayer.css"/>
<script src="zoomplayer/zoomplayer.js"></script>
<script src="https://www.youtube.com/iframe_api"></script>note: if you already have included jQuery in your document, do not include it again, jQuery should only be included once
- insert this inside your <body> tag where you want the player to appear
<div class="zoomvideoplayer auto-init" data-source="https://www.youtube.com/watch?v=2pQlqeiYWZw">
</div> - All done!
_______________
Recommended: Some web servers may not have html5 video support yet. So if you notice your videos do not work ( and were properly uploaded ) an easy fix is to add this to to your .htaccess file:
AddType video/ogg ogv
AddType video/webm .webm
AddType video/mp4 .mp4
Note: if you have created custom skins with the builder you also need to import db/skins.css and db/skins.js
Customise It - top
So let's explain the structure of the above so you can customize it to your needs.
The Item
<div id="mainplayer" class="zoomvideoplayer auto-init" data-source="https://www.youtube.com/watch?v=2pQlqeiYWZw">
</div>
This is the item structure. The id must be unique. The source field can be a youtube link ( or id ), a vimeo link ( or id ) or a mp4 video.
Setup an mp4 video with ogg backup
<div id="mainplayer" class="zoomvideoplayer auto-init" data-source="video/video.mp4" data-sourceogg="video/video.ogv">
</div>
The format .ogv is not necessary as zoomplayer will initiate a flash player backup on players that do not support mp4 ( like firefox ) . But it's recommended for a smooth playback.
Alternative Initiation
<div id="mainplayer" class="zoomvideoplayer" data-source="https://www.youtube.com/watch?v=2pQlqeiYWZw">
</div>
<script>
jQuery(document).ready(function($)){
dzszvp_init('#mainplayer', { cue: "off", autoplay: "on", settings_otherSocialIcons:""} );
});
</script>
Note that auto-init is no longer necessary as we will initiate the player through javascript. The emptathized text are options you can assign to the players. Described next:
Various Attributes
<div id="mainplayer" class="zoomvideoplayer skin-default auto-init " data-source="video/test.m4v" data-hd_source="video/test.m4v" data-options='{ cue: "off", autoplay: "on", settings_otherSocialIcons:"", settings_suggestedQuality: "large", responsive_ratio: "0.565", settings_enableAutoHide:"off"}' data-arg_downloadlink="http://digitalzoomstudio.net" data-arg_logoimg="img/logo.png" data-ad_array='[{"source":"video/advideo.mp4","sourceogg":"video/advideo.ogv","ad_type":"video","ad_time":"3","ad_skip_delay":"5","ad_link":"http://google.com"},{"source":"video/advideo.mp4","sourceogg":"video/advideo.ogv","ad_type":"video","ad_time":"10","ad_skip_delay":"5","ad_link":"http://google.com"}]' data-thumbnaildir="video/imagesfortest/" >
</div>
Note that auto-init is no longer necessary as we will initiate the player through javascript. The emptathized text are options you can assign to the players. Described next:
How to set up a RTMP / HSL / Live Stream with WOWZA Streaming Engine
Note: RTMP / HSL streaming might work with another service provider, but this guide is for WOWZA Streaming Engine
First, you must install WOWZA Streaming Engine. Once installed, when you go to the administration panel, you will see this panel when you click Test Video.

The fields we are interested in are Server and Stream from Adobe RTMP and Stream from Apple HSL - in order for the player to work on all devices.
<div class="zoomvideoplayer auto-init" data-source="mp4:sample.mp4" data-sourceogg="video/test.ogv" data-options='{ cue: "off", autoplay: "on", settings_otherSocialIcons:"", settings_rtmpServer:"rtmp://192.168.0.127:1935/vod"}' data-arg_downloadlink="http://digitalzoomstudio.net" data-sourcehsl="http://192.168.0.127:1935/vod/mp4:sample.mp4/playlist.m3u8">
</div>
If you integrating this into WordPress or a CMS that requires absolute urls, you should also link to the swf file in the options because the swf file is essential to playing RTMP.
<div class="zoomvideoplayer auto-init" data-source="mp4:sample.mp4" data-sourceogg="video/test.ogv" data-options='{ cue: "off", autoplay: "on", settings_otherSocialIcons:"", settings_rtmpServer:"rtmp://192.168.0.127:1935/vod", url_playerlight:"//yourdomain.com/pathto/playerlight.swf"}' data-arg_downloadlink="http://digitalzoomstudio.net" data-sourcehsl="http://192.168.0.127:1935/vod/mp4:sample.mp4/playlist.m3u8">
</div>
screencast - http://screencastle.com/watch/e5b1842d78eb8c884a382c717d08c6e2
How to add new components to builder
Just place a new html file in the db/components folder. The html file must have this format
<span class="pause-btn pause-btn-for-skin-avanti" style="width: 16px; height: 15px; position:absolute;left: 15px; bottom: 10px;">
<svg version="1.1" id="Layer_3" xmlns="http://www.w3.org/2000/svg" xmlns:xlink="http://www.w3.org/1999/xlink" x="0px" y="0px"
width="13.415px" height="16.333px" viewBox="0 0 13.415 16.333" enable-background="new 0 0 13.415 16.333" xml:space="preserve">
<path fill="#D2D6DB" d="M4.868,14.59c0,0.549-0.591,0.997-1.322,0.997H2.2c-0.731,0-1.322-0.448-1.322-0.997V1.618
c0-0.55,0.592-0.997,1.322-0.997h1.346c0.731,0,1.322,0.447,1.322,0.997V14.59z"/>
<path fill="#D2D6DB" d="M12.118,14.59c0,0.549-0.593,0.997-1.324,0.997H9.448c-0.729,0-1.322-0.448-1.322-0.997V1.619
c0-0.55,0.593-0.997,1.322-0.997h1.346c0.731,0,1.324,0.447,1.324,0.997V14.59z"/>
</svg> </span>
<span class="preview-img" style="background-image: url(img/preview_pause_avanti.png);">
</span>
Where the preview-img is the image that will show in the editor in the components area.
How to add video player in lightbox
First you need to import the zoombox/ folder in your project. Then just add this block of code with your desired thumbnail and video
<a href="video/test.mp4" class="zoombox effect-icona for-playbtn">
<img class="thumb-gamma" src="img/v1.png"/></a>
How to add multiple ads
You just need the data-ad_array attribute. The content must look like a json encoded string. Example below:
<div id="mainplayer" class="zoomvideoplayer skin-default auto-init " data-source="video/test.m4v" data-hd_source="video/test.m4v" data-options='{ cue: "off", autoplay: "on", settings_otherSocialIcons:"", settings_suggestedQuality: "large", responsive_ratio: "0.565", settings_enableAutoHide:"off"}' data-arg_downloadlink="http://digitalzoomstudio.net" data-arg_logoimg="img/logo.png" data-ad_array='[{"source":"video/advideo.mp4","sourceogg":"video/advideo.ogv","ad_type":"video","ad_time":"3","ad_skip_delay":"5","ad_link":"http://google.com"},{"source":"video/advideo.mp4","sourceogg":"video/advideo.ogv","ad_type":"video","ad_time":"10","ad_skip_delay":"5","ad_link":"http://google.com"}]' data-thumbnaildir="video/imagesfortest/" >
</div>
How to read mRSS feed
There is an example in index-readmrss.php. PHP Code:
<?php
include_once 'class-front.php';
$dzszvp = new DZSzvp_frontend();
echo $dzszvp->read_rss('mrss1.xml','{ cue: "off", autoplay: "on", settings_otherSocialIcons:"", settings_suggestedQuality: "large", settings_enableAutoHide:"on"}');
?>
How to generate instant preview thumbnails
First, you need the FFMpeg extension - http://ffmpeg.org/. Once it is properly configured, you can test by accessing the Terminal / Command Prompt and typing ffmpeg . The extension can also be called via PHP. This is a wrapper I wrote to generate the instant preview thumbnails:
<?php
//define('FFMPEG_LIBRARY', '/usr/local/bin/ffmpeg ');
$file = '/Applications/MAMP/htdocs/zoomvideoplayer/source/video/test.m4v';
$outputdir = '/Applications/MAMP/htdocs/zoomvideoplayer/source/video/imagesfortest/'; //--dont forget the ending "/"
create_thumbs_for_video($file, $outputdir);
function create_thumbs_for_video($file, $outputdir){
$cmd = '/usr/local/bin/ffmpeg -i '.$file.' -an -ss 00:00:00 -s 60x35 -r 1 -vframes 60 -f image2 -y '.$outputdir.'%01d.jpg';
exec($cmd, $output, $value);
var_dump($output);
var_dump($value);
var_dump($cmd);
}
A demo on how to use the integrated builder
FAQ - top
How to install in Joomla or another CMS solution
- unpack the download package, open the source folder
- copy the folder /zoomplayer and playerlight.swf into your site root folder or wherever ( but you must point to the scripts like below )
- you can include this in your page content, if you have html editing capabilities. preferable near the </body> element end
<script type="text/javascript" src="https://ajax.googleapis.com/ajax/libs/jquery/1.11.1/jquery.min.js"></script>
<link rel='stylesheet' type="text/css" href="http://yourserver.com/zoomplayer/zoomplayer.css"/>
<script src="http://yourserver.com/zoomplayer/zoomplayer.js"></script>note: if you already have included jQuery in your document, do not include it again, jQuery should only be included once
- insert this inside your <body> tag where you want the player to appear
<div class="zoomvideoplayer auto-init" data-options={url_playerlight:"//yourdomain.com/pathto/playerlight.swf}" data-source="https://www.youtube.com/watch?v=2pQlqeiYWZw">
</div> - All done!
How do I make my video properly encoded to use whitin the player ?
You need your movie converted to two formats in order to make sure the html5 video plays in all browsers.
Browser support & recommended encoding program
We recomend using Handbrake ( open-source ) for generating the mp4 file from your video file. We made a screenshot of some sample settings that we tested to work on iOS, Android, Safari, Chrome. See below:
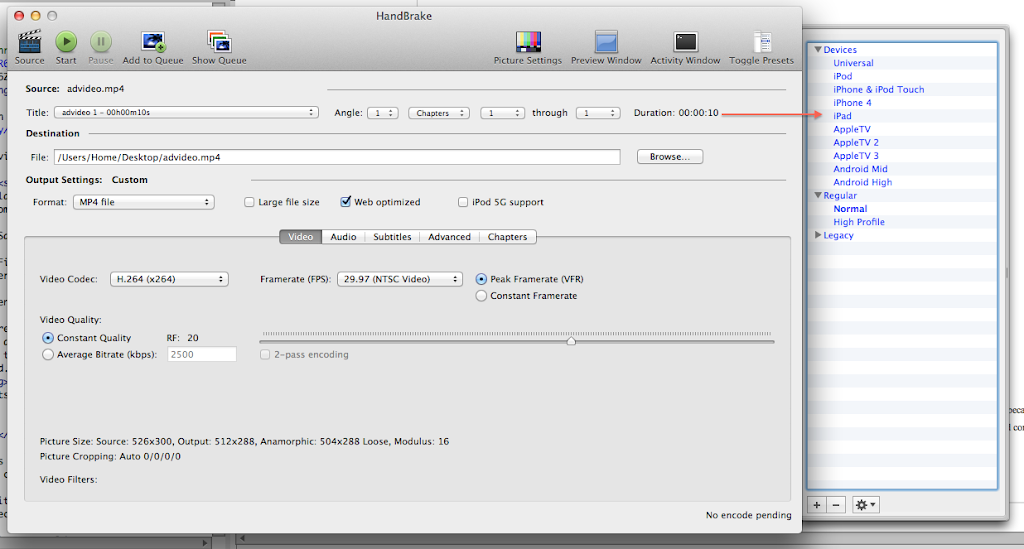
Then the ogv video is optional but can be generated too for best streaming, you can use an online service called Video-online-convert . You just have to upload the resulted mp4 and it will process it and offer a ogv download. That easy.
IE9, IE8 ( Flash ) & Safari : MP4 / M4V
Chrome & Opera & Firefox : OGG / OGV
What's the difference between jQuery(document).ready and jQuery(window).load?
When you want to manipulate pictures - ie: you depend on their size - like a ken burns slider or scroller does, it's best to use jQuery(window).load because that executes the code in it AFTER all the images and content has loaded. For everything else, there is jQuery(document).read -which only waits for the html to be parsed corectly & all elements formed.
Developer Tips - top
Recommended Programs
You can generally use any text editing software [ like notepad ] to edit content/code but this is what I recommend:
- .html / .css- Dreamweaver CS5
- .js - Aptana Studio3.0
- .scss - Netbeans with SASS plugin
SASS
If you are a developer you will notice there are some .scss files included too. This is the language for a css preprocessor which makes a developer's life easier. This is optional but if you want to try it here is the site.
Digital Zoom Studio